Page Contents
How to respond to GST Registration Show Cause Notice?
Often when we file a GST Registration application we receive an email having the SCN reference number on the registered email and phone. Once we have downloaded the notice received from the GST department, it is time to file the response or clarification for the query mentioned in the notice.
Learn: How to download GST Registration Show Cause Notice?
Its better to take professional help in filing clarification as there is only one chance of responding to the notice received. In case of inaccurate clarification, the application will be rejected by the GST officials and then again you will find the reasons for rejection for application. So, better to take help. You can contact us if you need our help.
Still, in this article, we will learn how clarification for the application will be filed.
Our Requirements
The status of our GST Application should be “Pending for Clarification” to file clarification for GST SCN. In case status is any other, then you cannot file clarification and there is a time limit also to file clarification which is mentioned on the Notice. So, the documents and things required are.
- TRN (Temporary Reference Number)
- ARN (Acknowledgement Reference Number) or SCN Reference Number
- Additional Documents and Response Drafted
Now moving forward on the GST portal at gst.gov.in
Step by Step Procedure for filing Clarification for GST Show Cause Notice (SCN)
Step 1: Once you have opened the GST Portal on the desktop, please don’t try on the Phone. Go to Services > Registration.
Since we have been filing the response we don’t need to select the New Registration, instead of opening application using the Temporary Reference Number. TRN number is a must.
In case you are not able to find the TRN number as many people are not aware of it. Check the email or phone when you first filed the GST application (GST Reg-01). Hope you find it!
Enter the TRN Number along with the letters “TRN” in the end and click on Proceed Button.

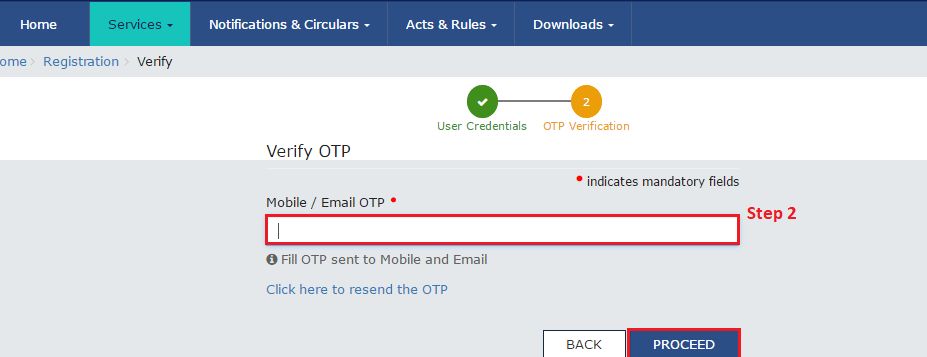
Step 2: The second step is to open the email and check out phone for the OTP received and then enter it. In this verification, both the OTP are the same. And then move forward by clicking on the “Proceed” button.

Step 3 Now we are logged in the GST Portal, Go to Services> Registration> Application for filling clarifications like in the below picture.
Please don’t go anywhere else or navigate on the other pages like again on New Registration, your session will expire and then again you will be logging in.

Step 4 Now we need an ARN number or SCN reference number. ARN number is received on the email and phone after submission of application and SCN reference number can be found on the email received. Also, both of them are mentioned on the Show cause notice downloaded (PDF file).
Enter the SCN reference number or ARN and then click on the search button.

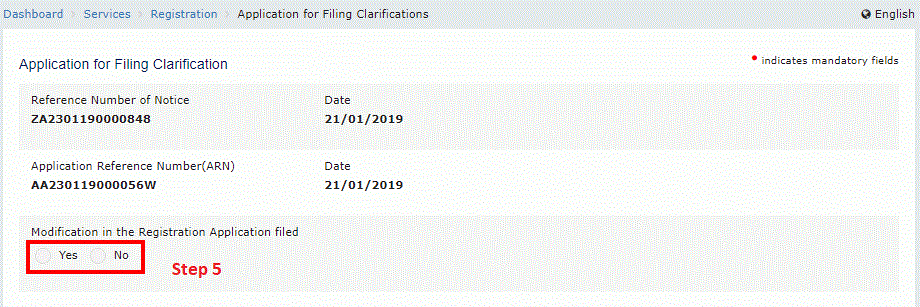
Step 5 Once you have clicked on the search button above. The Clarification application (GST Reg-04) would appear in the below picture. Now, you have to select whether you want to modify the GST Application filed (GST REG-01) or you don’t want to change anything.
Here, comes the most important point. Remember, you cannot change most of the things in GST Reg-01. In case there is some major flaw that cannot be rectified, then no matter what you do, your application will be rejected.

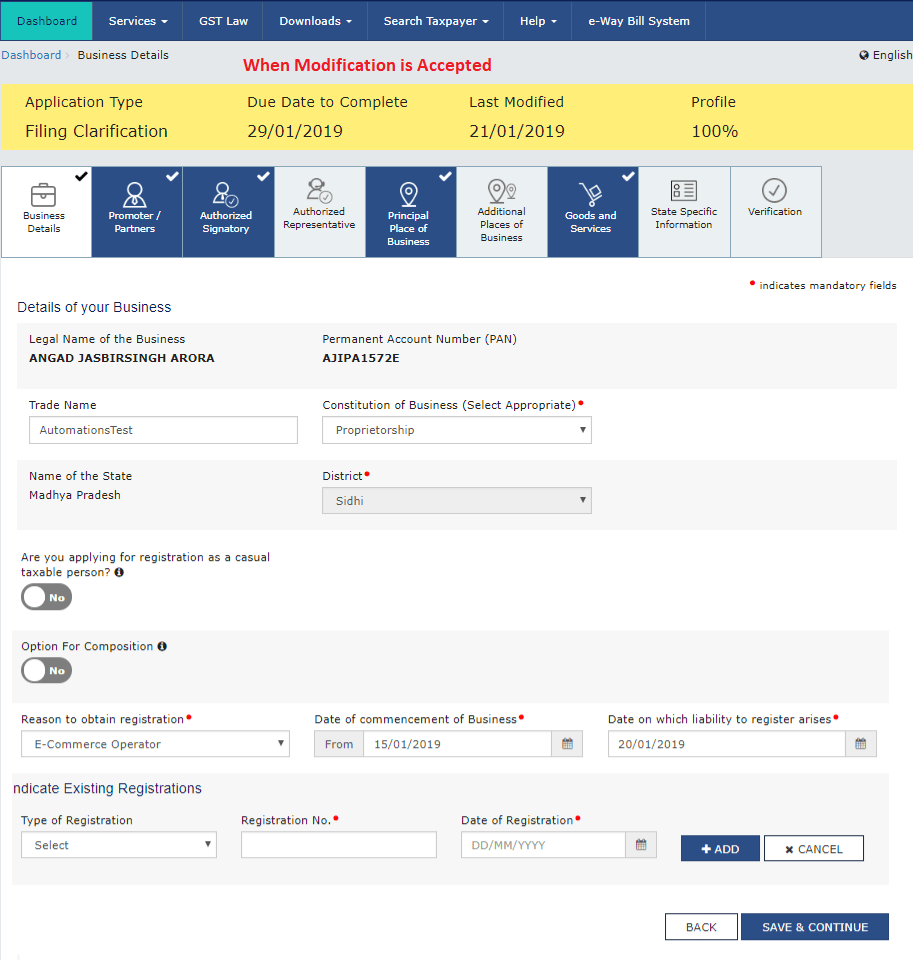
Step 6 When we choose “Yes” above, that is a modification in the registration application. The screen would appear like this below. Here you cannot modify everything, only a few can be changed. The GST Reg-01 so filed earlier can be modified.

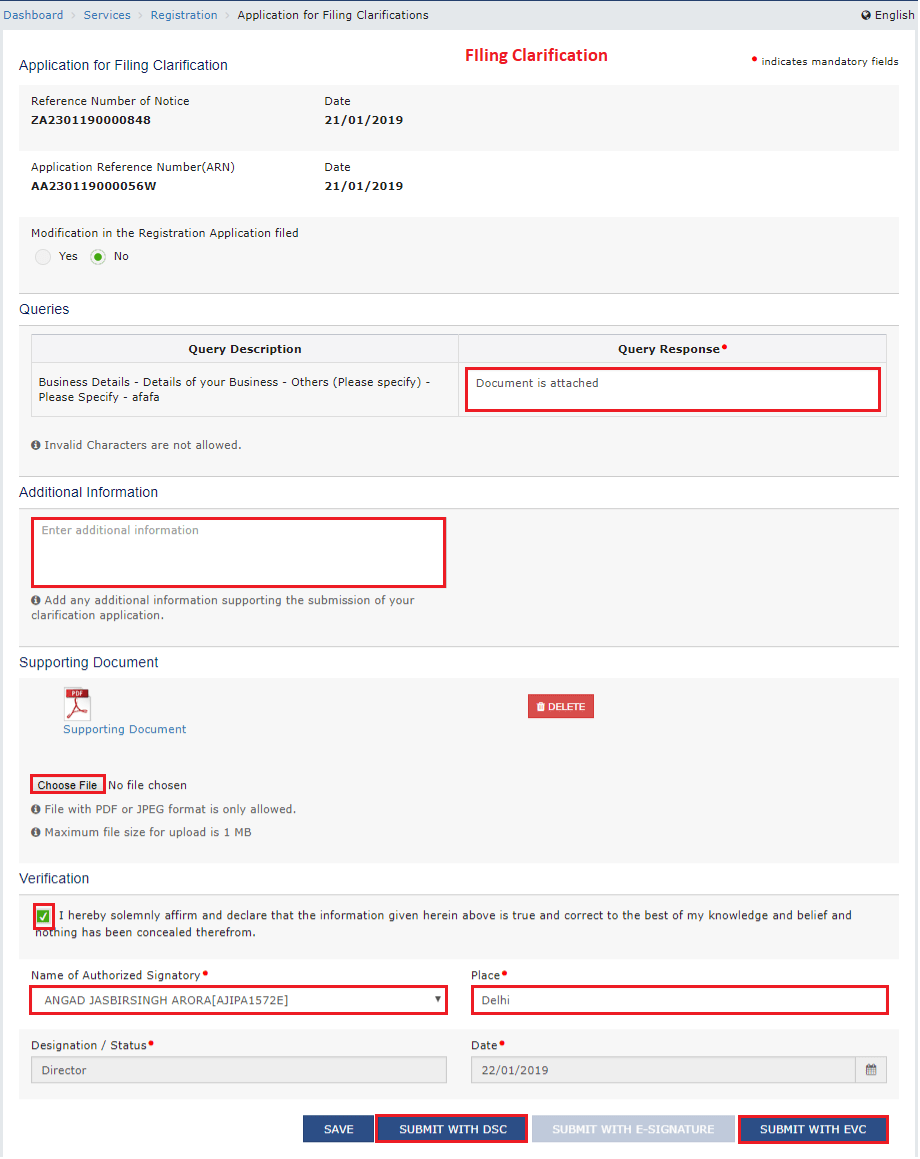
Step 7 If we would have selected “No” in step 5, the screen would have appeared like this on only one page. Even in the “Yes” case, the verification page would have been the same.
Here the “Query Description” would be the same as mentioned on the GST Show Cause Notice and the query response needs to be filed.
In the “Additional Information”, we can add any other comments to bring the attention of the GST Official.
Attach the supporting documents as mentioned in the notice or any other which are necessary. Then, Verify and either click on the “Submit with DSC” or “Submit with EVC” button.
The clarification would be filed once the submission is done with OTP. No, rectifications can be made now and there is only one chance. So, check twice.

Step 8 Once the clarification is filed, an ARN number would appear on the screen. Save it for future help. The same would have been received on the registered email and phone. It will help us track the status of GST Reg-04 in the future.

Now, you need to do nothing and wait for the GST Officer to respond. In case the response is accepted, you will receive the first-time login credentials.
Learn: How to create GST login credentials?
In case the application gets rejected, you will receive an email stating an order of rejection of application on the email. Now, you need to find out the reason for rejection of application.
Read: Check GST Rejection Reason
In case you need our assistance, you can contact us at +918588918033 or contact us via website.
Image Credits: GST portal

